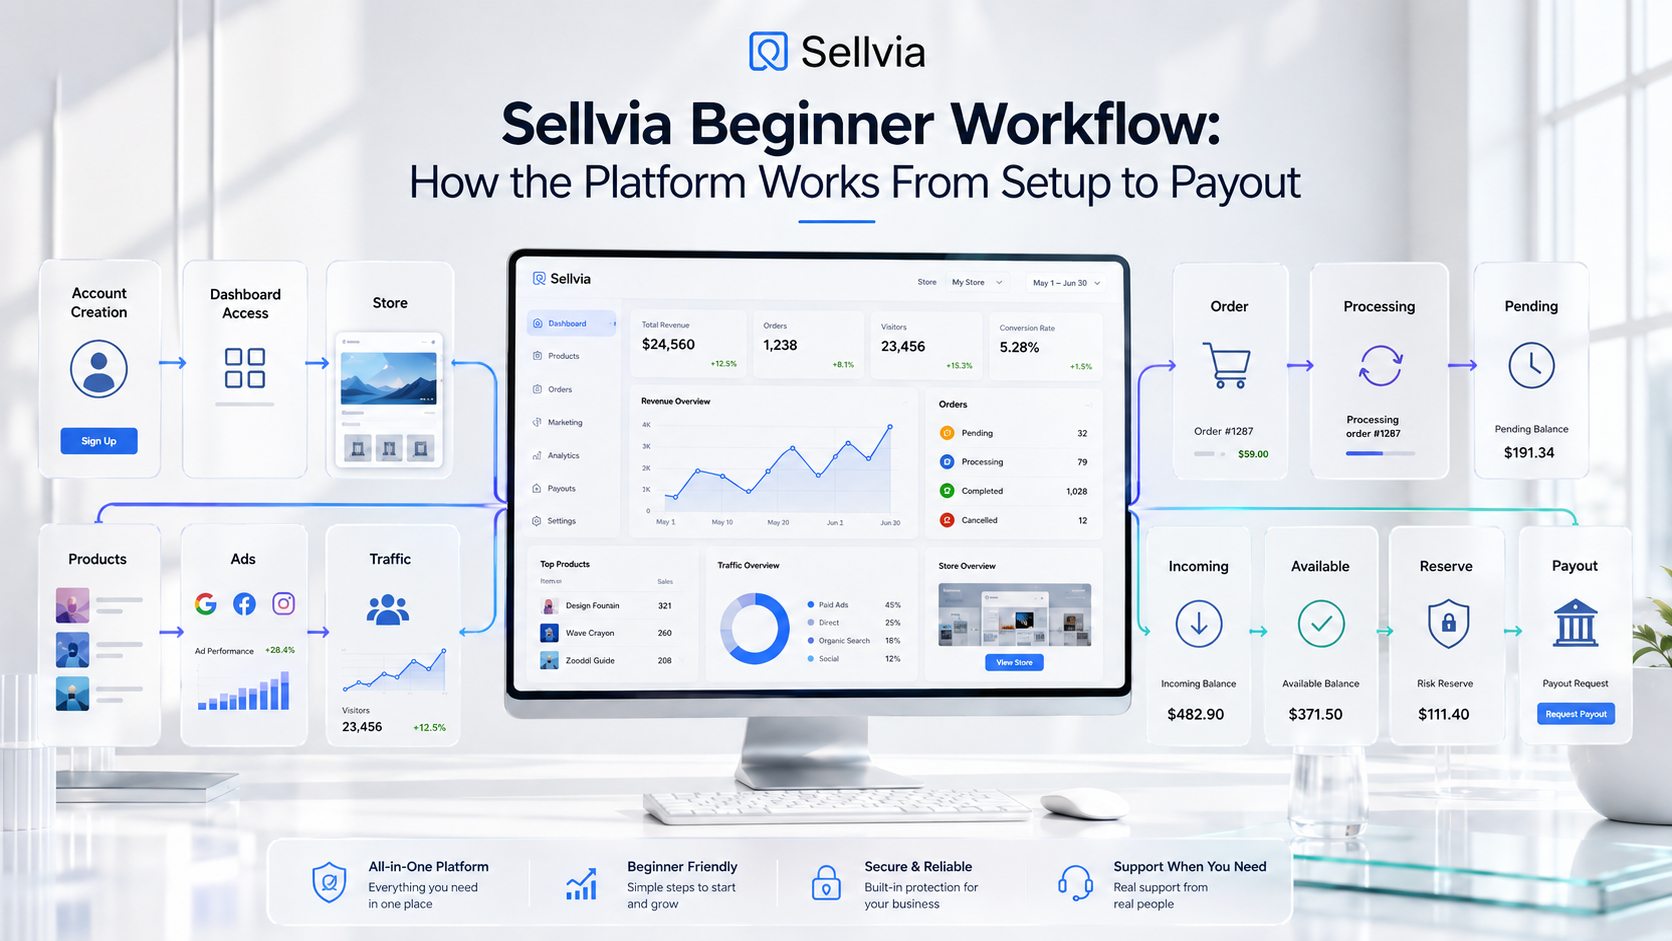
Sellvia gives a new user access to a ready-made store within minutes, but that access by itself doesn’t explain what to actually do next. The beginner still has to configure the storefront, choose products, prepare the store for visitors, turn on advertising, watch how traffic behaves, process incoming orders, and follow the money through several balance stages before any of it can be withdrawn. This is the question this guide answers: how does Sellvia work in practice, from the moment an account is created to the point where funds are eligible for a payout?
This article is written from the point of view of the person running the store, not as a review or a general definition of the platform. For a full breakdown of what the platform is and how it is structured, see our complete Sellvia platform explanation. This piece stays focused on the operational sequence: what happens, in what order, and what the store owner is expected to do at each step.
This is an independent, non-affiliated resource. It is not the official Sellvia website, and nothing here should be treated as financial advice. Pricing and policy details are current as of this writing and should be checked in your own dashboard before you rely on them, since SaaS platforms update terms over time.
This guide focuses specifically on the digital-product workflow available through the Sellvia store reviewed for this website. Sellvia may also describe other product types or service configurations in its broader documentation.
How Sellvia Works in One Minute
Quick Answer
Sellvia is a subscription-based platform that bundles a ready-made digital storefront, a catalog of digital products, built-in advertising, order management, balance tracking, and a payout system into a single dashboard. Instead of assembling a store, a payment processor, an ad account, and a reporting tool separately, the user works from one interface.
The user’s side of the workflow is narrower than the platform’s side: configure the storefront, select products, fund advertising, monitor performance, process orders, track balances, and request a payout or reinvest.
| Sellvia stage | What the platform provides | What the beginner does |
|---|---|---|
| Account | Trial and dashboard access | Reviews terms and activates the account |
| Store | Ready-made storefront | Configures branding and pages |
| Products | Digital catalog | Selects relevant products |
| Ads | Built-in advertising | Funds and monitors campaigns |
| Orders | Order-management system | Processes incoming orders |
| Balances | Pending, Incoming, Available, Reserve | Tracks the movement of funds |
| Payout | Withdrawal controls | Requests eligible funds |
Read top to bottom, the table traces the same path this guide follows: account, then store, then products, then traffic, then orders, then money. Each row depends on the one before it. A store with no products can’t attract useful traffic, and traffic with no processed orders never turns into an Available balance.
What a Beginner Should Prepare Before Joining Sellvia
Before creating an account, it helps to separate money into three distinct pools rather than treating the whole budget as one lump sum:
- Sellvia subscription – the recurring platform fee.
- Advertising spend – the daily amount used to fund campaigns.
- Order processing and working capital – the reserve used to process orders as they come in, separate from ad spend.
Treating these as one pot is one of the most common sources of confusion for new users, because a sale can arrive at the same time an ad campaign is running, and both draw from the same account if there isn’t a clear plan for each. Full current pricing across every subscription tier is covered in our Sellvia pricing guide; the numbers below are enough to plan a first month.
Checklist · Before You Sign Up
- A payment method on file
- A defined monthly subscription budget
- A separate advertising test budget for the first 30 days
- A processing and working-capital reserve set aside from the ad budget
- A working store name and a general niche direction
- A domain idea, even if the default domain will be used at first
- Basic contact information for the storefront
- An understanding of where legal and policy pages will need to be added
- A written, defined 30-day testing budget you’re comfortable spending regardless of outcome
Phase 1 — Creating the Sellvia Account
Account creation itself is short. The user registers, provides payment details to activate the trial period, and is dropped into a dashboard that already contains a functioning store. Sellvia’s free trial runs for 14 days, and a payment method is required to activate it, so the subscription renews automatically once the trial ends unless the account is cancelled first. Login credentials, store provisioning, and support access are typically available immediately. What matters more than the signup form is what the beginner does in the first hour afterward.
First 10 Minutes in Sellvia
- Confirm the current subscription price in the billing section
- Record the exact trial expiration date
- Locate the subscription settings
- Locate the Products section
- Locate the Ads section
- Locate the Orders section
- Locate Reports
- Locate Balances
- Locate Payouts
- Identify how to reach support if something is unclear
What Sellvia Handles During Account Setup
The platform handles account creation, dashboard provisioning, the underlying store infrastructure, hosting, the connection to the product catalog, and access to the core set of tools inside the dashboard. None of this requires the user to set up servers, install software, or configure a content management system.
What the Beginner Should Confirm
Before the trial period ends, it’s worth confirming the renewal date, the cancellation procedure, the billing method on file, whether advertising will be charged separately from the subscription, which tools are included at the base tier, the conditions attached to store access, and whether a second store would require its own separate subscription.
Phase 2 — Configuring the Ready-Made Sellvia Store
“Ready-made” means the technical shell of the store, the hosting, the dashboard connection, and the basic page structure already exist. It does not mean the store is finished. The beginner still needs to personalize the storefront so it reads as a specific, coherent brand rather than a generic template.
Areas to configure: store name and logo, domain (default or upgraded), color scheme and visual theme, homepage messaging, navigation structure, product categories, contact page, legal pages, refund and policy information, payment settings, and mobile display.
The genuine advantage here is that none of this infrastructure has to be built from nothing. The beginner is editing an existing structure rather than assembling one from a blank page, which removes a large share of the technical barrier that stops many people from starting at all.
Checklist · Sellvia Store Ready for Traffic
- Store name and logo are in place
- Homepage message is clear and specific to the niche
- Navigation and categories make sense to a first-time visitor
- Contact page is complete
- Legal and refund pages are published
- Mobile layout has been checked on an actual phone
- Payment settings are confirmed and active
Phase 3 — Selecting Sellvia Digital Products
The Sellvia catalog is organized by category, and each product typically appears as a card showing an image, a short description, and relevant details. Selecting a product adds it to the storefront, where the beginner can review its listing content, adjust presentation where permitted, and remove anything that doesn’t fit the store’s direction.
The products themselves are digital: ebooks, guides, checklists, templates, online courses, video lessons, and other downloadable educational resources. Because these are digital, there’s no need to manage stock levels or physical delivery mechanics. The clear advantage is that a beginner starts with a working catalog rather than having to create every product independently from scratch.
A Focused Beginner Product Strategy
- Choose one clear niche rather than mixing unrelated categories
- Start with a limited, manageable number of products
- Keep the collection coherent so it reads as one store, not a catalog dump
- Arrange products around a clear customer need
- Test a small group before expanding the catalog further
- Avoid an overcrowded storefront that dilutes the store’s identity
None of this guarantees that any specific product will sell. It simply narrows the store enough that early performance data, once it arrives, is easier to interpret.
Phase 4 — Preparing the Sellvia Store Before Advertising
Turning on advertising before the storefront is ready tends to waste the early visitor traffic that ad spend is paying for. Before activating campaigns, it’s worth walking through the store the way a first-time visitor would.
Pre-Launch Inspection Routine
- Homepage message is clear within a few seconds of landing
- Product pages load correctly and read well
- Navigation and categories work as expected
- Pricing displays correctly
- Spelling and basic copy have been checked
- Contact information is visible
- Privacy policy and disclaimer are published
- Refund information is easy to find
- Mobile appearance has been tested, not just assumed
- Checkout flow works end to end
- Pages load at a reasonable speed
- Visual style is consistent across pages
Phase 5 — Activating Sellvia Built-In Ads
Sellvia’s advertising system is built into the same dashboard used for the store, so campaigns can be activated without setting up a separate ad account on an outside platform. Sellvia Ads start at $10 per day, and eligible new accounts commonly receive a complimentary advertising credit toward that first spend. Higher budget levels unlock after the ads have run continuously for specific periods: $15 per day after 5 days, $20 per day after 10 days, $30 per day after 20 days, and $50 per day after 30 days. The budget cannot be raised manually ahead of schedule; it only becomes available once the relevant milestone is reached, though it can always be lowered back to a previous level. The current unlocked level and billing settings should be reviewed inside Ads Settings before making any change, as described in Sellvia’s Help Center article on Sellvia Ads.
| Budget | Availability |
|---|---|
| $10/day | First 5 days |
| $15/day | Unlocks after 5 days |
| $20/day | Unlocks after 10 days |
| $30/day | Unlocks after 20 days |
| $50/day | Unlocks after 30 days |
Advertising is billed separately from the base subscription, and a management or service fee is applied on top of ad spend to cover the campaign automation itself. Orders are never guaranteed by turning on a campaign. What matters is defining a maximum testing budget in advance and judging performance by cost per order and net margin rather than by traffic volume alone.
| Daily advertising budget | Approximate 30-day spend |
|---|---|
| $10 | $300 |
| $15 | $450 |
| $20 | $600 |
| $30 | $900 |
| $50 | $1,500 |
These totals are arithmetic illustrations only, not spending requirements or profit forecasts.
What Sellvia Advertising Simplifies
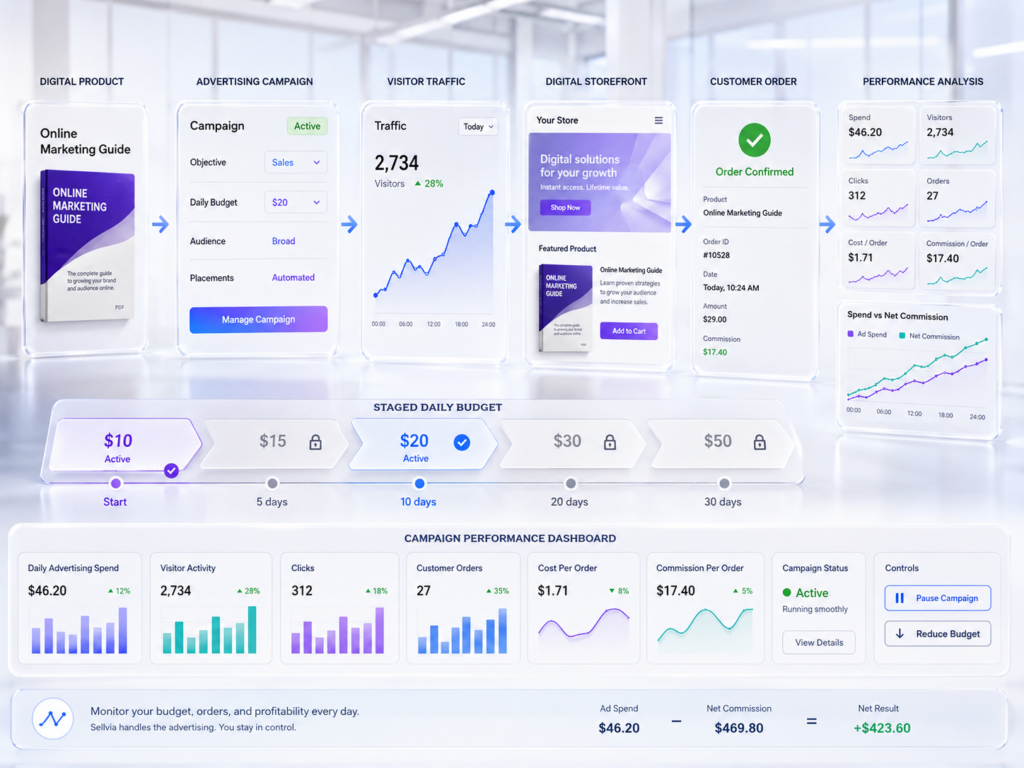
Campaign setup, targeting, and reporting are handled inside the same system used for the store, which lowers the technical barrier for someone who has never managed an ad account before. Optimization and creative rotation are largely automated, which reduces the number of separate tools a beginner would otherwise need to learn.
What the Beginner Should Review Every Day
- Daily advertising spend
- Visitor activity
- New orders
- Cost per order
- Commission recorded per order
- Any unprocessed orders
- Available processing funds
- Pending balance
- Incoming balance
- Available balance
Phase 6 — Understanding Early Sellvia Traffic
Once a campaign is live, the dashboard begins showing exposure, clicks, visitors, product-page views, and eventually orders. Early data is often mixed: some traffic arrives without producing orders, some orders arrive at a high cost per order, and some orders bring in commission that comfortably exceeds what was spent to generate them.
None of this data points to a single correct benchmark, and any number presented as an “ideal” conversion rate should be treated with skepticism. What early campaign data is genuinely useful for is comparison: which products draw clicks, which pages hold attention, and whether the numbers are trending in a direction worth continuing to fund.
Phase 7 — Receiving the First Sellvia Order
When a customer completes a purchase, the order appears inside the dashboard along with the product sold and the commission recorded against it. At this point the sale is real, but the commission is not yet withdrawable cash. The order still requires processing before funds begin moving through the balance stages.
Hypothetical Example
A customer purchases a digital guide from the store. The order appears inside Sellvia. The commission is recorded. The order still requires processing. The commission is not yet Available cash.
Phase 8 — Processing a Sellvia Order
This is the step where cash flow, rather than product selection, becomes the main variable to manage. Every time an order is processed, a processing fee applies, ranging from approximately 9.99% to 18% depending on the order, as detailed in Sellvia’s Help Center article on order processing.
Processing can be funded with a saved bank card or with sufficient Order Processing Credits. Sellvia’s current documentation states that the Commission Balance, including Available funds, cannot be used directly to process an order.
If Order Processing Credits are funded and sufficient, Sellvia can process an order automatically; if they aren’t, the order has to be processed manually with a saved card. Orders that aren’t confirmed for processing within three days can trigger a late processing charge on top of the standard fee, and orders left unprocessed altogether are automatically cancelled after seven days. Before that cancellation happens, the system makes one automatic attempt to process the order using any funded Order Processing Credits.
Order Processing Checklist
- Open the order inside the dashboard
- Review the product and the recorded commission
- Check the processing cost shown for that order
- Confirm your card or Order Processing Credits balance can cover it
- Process the order before the seven-day deadline
- Confirm the updated order status
- Review the Incoming balance to see the funds begin moving
Why Sellvia Processing Requires Working Capital
The customer has already paid, and a commission is visible in the dashboard, but that commission is not yet withdrawable, and it cannot be used to pay for processing the order that generated it. Processing has to be funded separately, from a card or from pre-loaded Order Processing Credits, and advertising may be running at the same time, drawing from the same account. A dedicated processing reserve, kept separate from the ad budget, prevents a busy week of orders from interrupting the workflow or triggering a late processing charge. This is best understood as ordinary cash-flow planning rather than a flaw in how the platform is built.
Phase 9 — Tracking Sellvia Balance Stages
Funds recorded from an order move through a sequence of balance stages before becoming spendable. Understanding this sequence is what separates “money that appears in a report” from “money that can actually be withdrawn.”
| Sellvia balance | Meaning | Beginner action | Withdrawable? |
|---|---|---|---|
| Pending | Order recorded and awaiting processing | Process the order using a card or Order Processing Credits | No |
| Incoming | Processed funds in a 72-hour holding period | Wait and monitor | No |
| Available | Released eligible funds | Withdraw or reinvest (subject to trial restrictions below) | Yes, once the $100 minimum is met |
| Risk Reserve | 25% security hold released after ~125 days | Wait for release | Not immediately |
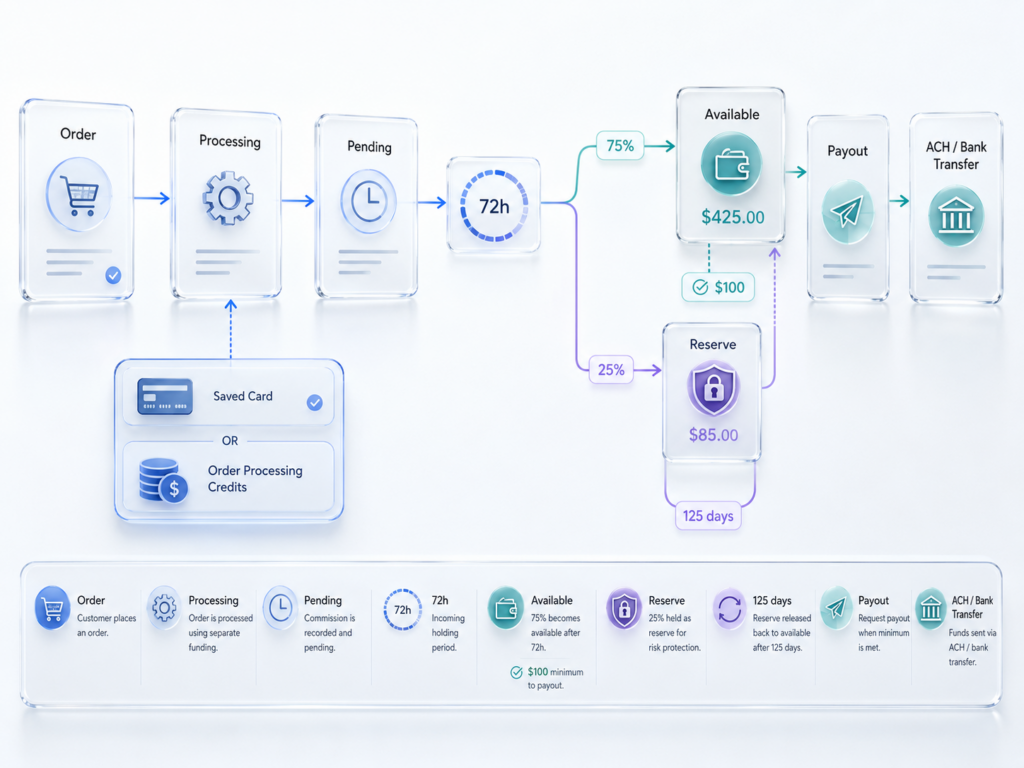
Total recorded commission and the Available balance are not the same number, and beginners who don’t distinguish between them are often surprised by how much of their revenue sits in Incoming or Reserve at any given moment. Once an order is processed, its funds enter Incoming for 72 hours. After that window closes, 75% of the amount moves into the Available balance and the remaining 25% moves into Risk Reserve, where it stays for approximately 125 days before it automatically releases into Available as well. None of the Risk Reserve amount is lost; it’s held rather than charged. This sequencing is confirmed in Sellvia’s Help Center article on earning through the Sellvia store.
Following One Commission Through All Stages
A single order’s commission is recorded in Pending. Once the order is processed, that same amount shifts into Incoming for 72 hours. After that period ends, three-quarters of it becomes Available, and the remaining quarter moves into Risk Reserve, where it will sit for about 125 days before joining the Available balance automatically.
Phase 10 — Reinvesting or Requesting a Sellvia Payout
Once funds reach Available, the beginner generally has two options: reinvest into the store or request a bank payout. A payout can be requested once the Available balance reaches at least $100. Available funds are not automatically usable for order processing; if the platform supports converting Available funds into Order Processing Credits, that conversion is a separate step and may carry its own fee, so it’s worth checking current terms before assuming the balance will cover the next order on its own.
Bank withdrawals are not available during the 14-day free trial. Eligible Available funds remain in the account and become withdrawable after the paid subscription becomes active, subject to the $100 minimum and current payout requirements.
Current Sellvia documentation lists a 5% ACH withdrawal fee with a $10 minimum and a 7% international wire fee with a $30 minimum. Express versions of both transfer methods are also available at a higher fee (around 14%), with their own minimum charges. These figures come from Sellvia’s Help Center article on dashboard fees and should be checked again before requesting a payout, since fee schedules can change.
Withdrawing the entire Available balance the moment it becomes eligible can leave the account without funds for advertising or for building up Order Processing Credits ahead of the next order. Keeping a working buffer, rather than pulling out every available dollar immediately, tends to keep the day-to-day workflow running more smoothly. This is a matter of practical planning, not individualized financial advice.
The First 30 Days With Sellvia
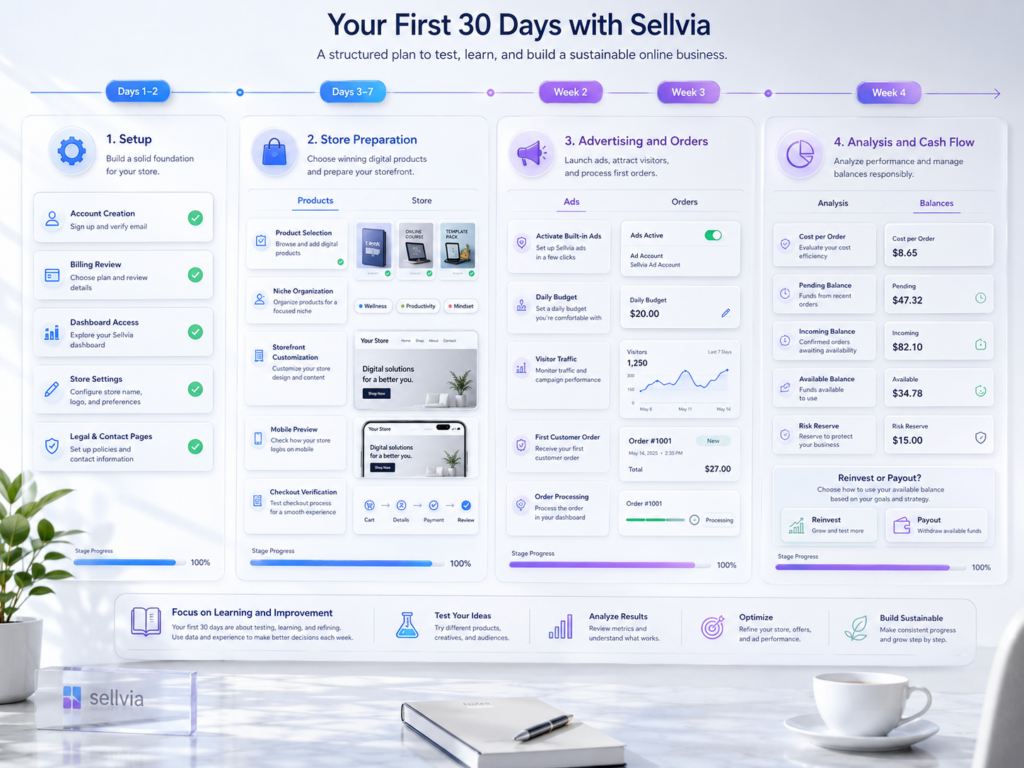
| Timing | Focus |
|---|---|
| Days 1–2 | Create the account, verify billing, review the dashboard, configure basic store settings, add legal and contact pages. |
| Days 3–4 | Review the catalog, choose a focused product collection, complete the storefront, inspect the mobile version. |
| Days 5–7 | Activate advertising, set a defined testing budget, monitor initial traffic, confirm processing funds are available. |
| Week 2 | Review campaign activity, monitor new orders, process orders promptly, track Pending and Incoming funds. |
| Week 3 | Calculate cost per order, compare commissions against ad spend, review working-capital needs, identify stronger and weaker products. |
| Week 4 | Evaluate campaign economics, review Available funds, understand the Risk Reserve, decide whether to maintain, reduce, or increase spend, and consider reinvestment or a payout once eligible. |
The first month with Sellvia isn’t really about hitting a sales target. It’s about learning which products draw interest, how much each order actually costs to process, how much working capital the store needs on hand, how long funds take to become Available, and whether the current budget is sustainable to continue past day 30.
A Complete Sellvia Workflow Example
Fictional Illustration · Not a Performance Claim
Consider a hypothetical user, Maria, who signs up for Sellvia and activates her trial. She spends her first two days reviewing the dashboard and setting up her store’s contact and legal pages. Over the next two days she selects four digital products in a single niche and finishes personalizing her storefront.
On day six she activates advertising at the $10-per-day starting level. Traffic begins arriving within the first day of the campaign. On day nine, her store records its first order: a customer purchases one of her digital guides, and a commission appears in her dashboard under Pending.
Maria processes the order the same day using her saved card, since her Order Processing Credits balance isn’t funded yet. The commission moves into Incoming for 72 hours. Once that period ends, most of the amount becomes Available, with a smaller portion held in Risk Reserve for about 125 days. By the end of week four, Maria’s Available balance has crossed $100, and her trial has already converted to a paid subscription, so she requests a payout with part of it while reinvesting the rest into advertising.
This example explains the Sellvia workflow and does not represent expected sales, profit, or advertising performance.
What Sellvia Automates for Beginners
The platform handles account provisioning, the underlying store infrastructure, hosting, the connection to the digital product catalog, the advertising interface and campaign execution, order-status tracking, the movement of funds between balance stages, reporting, and the payout-request controls themselves. For someone who doesn’t want to combine a store builder, a separate ad platform, and a separate accounting tool, having all of this centralized in one dashboard is a genuine practical advantage.
What Sellvia Users Still Control
Automation covers infrastructure, not decision-making. The user remains responsible for niche selection, individual product decisions, storefront presentation and branding, the advertising budget itself, daily monitoring of the store, processing every order that arrives, maintaining working capital, any required customer communication, ongoing performance analysis, legal pages, tax obligations, subscription management, and any decisions about scaling. Sellvia automates the technical layer; the person running the store remains the operator.
Why the Sellvia Workflow Can Be Beginner-Friendly
The workflow tends to be approachable for newcomers for a specific set of reasons: the store infrastructure already exists rather than needing to be built, hosting and the dashboard are already connected, digital products are available through the catalog without needing to be created from scratch, there’s no physical inventory to manage, built-in ads reduce the setup work involved in running a campaign, orders are managed in one central place, balance stages make the movement of money visible rather than opaque, and the overall sequence follows a logical order rather than requiring the user to piece several unrelated services together. None of this implies that an easier setup guarantees business success. It simply lowers the technical barrier to getting started and staying organized once orders begin arriving.
Common Beginner Mistakes With Sellvia
- Treating the subscription as the whole budget. Fix: Set aside separate amounts for advertising and processing from the start.
- Turning on ads before the store is finished. Fix: Complete the pre-launch inspection first.
- Adding too many unrelated products. Fix: Keep the early catalog focused on one niche.
- Ignoring cost per order. Fix: Check this number regularly, not only total traffic.
- Using all available capital for advertising. Fix: Keep a working-capital reserve untouched.
- Assuming Available funds can pay for the next order. Fix: Fund processing with a card or Order Processing Credits instead.
- Treating recorded commission as withdrawable money. Fix: Track which balance stage it’s actually in.
- Missing the processing deadline. Fix: Process orders within seven days to avoid cancellation and late fees.
- Withdrawing every Available dollar immediately. Fix: Leave a buffer for the next processing cycle.
- Increasing the budget before understanding break-even economics. Fix: Confirm the numbers first, then let the budget unlock naturally.
A Simple Sellvia Daily and Weekly Routine
Daily Sellvia Routine
- Check advertising spend
- Review campaign activity
- Check for new orders
- Process eligible orders
- Review order statuses
- Check Pending and Incoming balances
- Review Available funds
- Review support or account notifications
Weekly Sellvia Routine
- Calculate advertising cost per order
- Compare ad spend with net commission
- Review product performance
- Calculate processing-capital needs for the week ahead
- Review subscription charges
- Examine how balances have moved over the week
- Decide whether to maintain or reduce advertising while waiting for the next budget unlock
- Update the store where needed
Consistency matters more here than intensity. Checking the dashboard only when an order notification arrives means missing the campaign and cash-flow trends that actually explain why orders are or aren’t arriving.
How Sellvia Works in Practical Terms
Put simply, Sellvia supplies the storefront infrastructure, hosting, the digital product catalog, built-in advertising, order controls, performance reporting, balance tracking, the Risk Reserve mechanism, and the payout workflow. The user supplies the product decisions, the branding, the advertising budget, the processing capital, ongoing performance monitoring, and day-to-day management.
Sellvia can make the path from setting up a store to processing orders and requesting eligible funds more organized and technically accessible, especially for beginners who follow the workflow carefully, keep working capital separate from ad spend, and maintain a realistic operating budget rather than expecting results on a fixed timeline. For a broader look at whether the platform is worth it overall, see our independent Sellvia review; for the full list of beginner resources, start with our main Sellvia guide.
Frequently Asked Questions
What is Sellvia?
Sellvia is a subscription-based platform that provides a ready-made online store, a catalog of digital products, built-in advertising, and tools for managing orders, balances, and payouts from a single dashboard. It’s built for people starting a digital-product business without a technical background.
How does Sellvia work?
A user signs up, receives a ready-made store, configures the storefront, selects digital products, and activates built-in advertising. When a customer buys, the order must be processed before commission funds move through Pending, Incoming, Available, and Risk Reserve stages, eventually becoming eligible for a payout or reinvestment.
Is Sellvia suitable for beginners?
It can be, since the store infrastructure, hosting, and product catalog are already set up. However, beginners still need to actively manage product selection, advertising budgets, order processing, and working capital. The setup lowers the technical barrier but does not remove the operational responsibilities involved in running a store.
Does Sellvia provide a ready-made store?
Yes. New accounts receive a functioning storefront connected to the dashboard, with a default structure already in place. The beginner still needs to personalize branding, navigation, legal pages, and product selection before the store is genuinely ready to receive advertising traffic.
How are digital products added to Sellvia?
Products are selected from Sellvia’s built-in catalog, which includes items like guides, checklists, templates, and online courses. The user browses categories, reviews product cards, and adds relevant items directly to the storefront rather than creating each product independently.
How do Sellvia built-in ads work?
Sellvia Ads run from inside the same dashboard used for the store, starting at $10 per day. Higher budget levels unlock automatically after ads have run continuously for set periods (5, 10, 20, and 30 days), rather than being available on demand. New users often receive a promotional advertising credit toward their first campaign.
What happens when a Sellvia customer places an order?
The order appears in the dashboard along with the commission earned. At this point the sale is recorded but not yet withdrawable. The order needs to be processed before the associated funds begin moving through the platform’s balance stages.
Why do Sellvia orders require processing?
Processing covers the cost of completing and delivering the transaction, and it carries a fee of roughly 9.99% to 18%. It has to be funded with a card or with Order Processing Credits, since the Commission Balance itself cannot be used directly to process an order, even once part of it is Available.
How do Sellvia balance stages work?
Recorded commission moves through four stages: Pending, which is not withdrawable; Incoming, a 72-hour holding period after processing; Available, which can be withdrawn once it reaches $100 or reinvested; and Risk Reserve, a 25% security hold released automatically after about 125 days.
How does a Sellvia payout work?
Once the Available balance reaches at least $100 and the account is on a paid subscription rather than the free trial, the user can request a payout through a supported method such as ACH or wire transfer, each carrying its own fee. Funds can also stay in the account to support future advertising instead of being withdrawn.

Veronica Jameson is a digital commerce analyst and contributing author at Sellvia.co. Her work explores the practical side of launching and operating an online business, with particular attention to platform usability, advertising decisions, startup budgeting, and performance analysis. Veronica approaches each topic from a beginner’s perspective, breaking down unfamiliar processes and highlighting the details that can influence day-to-day results. Her goal is to give readers realistic context and useful guidance rather than simplified promises.


Leave a Reply